Hello friends, today we're going to know about the custom redirects, when to use them, and how to set custom redirects in blogger. Yes! you can set custom redirects in blogger, most of the new bloggers don't know about this, but it is an essential feature in blogger.
For a better Search Engine Optimization of your blog and a better user experience, you must know about what custom redirects are and how it works.
In blogging, we write, publish, and update the posts day to day. Sometimes because of this, there are broken links in your blog which show a 404 not found page. You can easily fix such links with the custom redirects settings in blogger, but first let's learn what custom redirects are and how it works.
What are Custom Redirects?
Redirect in blog means to divert an invalid webpage or URL to a good webpage or URL. Custom Redirects is such a feature of Blogger through which we can redirect one post of our blog to another post.
In other words, you're redirecting the visitors from one URL to another place so that your visitors can get the correct information and their user experience is good.
There are two ways from which you can set custom redirects in Blogger.
- 302 Redirect: This is a Temporary Redirect. When we want to show another page instead of the URL of a web page for a short time, then we use this redirect. There is no link juice transfer in this.
- 301 Redirect: This is a Permanent Redirect. When we permanently redirect the URL of a page or post to another URL, only then is it used. The link juice in the old URL from the 301 redirect gets wholly transferred to the new link.
When to use Custom Redirects?
Now the question will be why we should use custom redirects and how to do it. When should redirects be done?
Reason 1: If you are changing the permalink of the old post in the blog for some reason, you should use custom redirects. When you are going to change the old permalink, this old link indexed in the search engines will show an error page whenever a visitor clicks on that link, it comes with a 404 error message. In this situation, you can redirect the old link to the new link so that the visitors coming to your old link redirects to the new link.
Reason 2: There are some posts in the blog which becomes outdated after some time. That post is indexed in the search engines but you have updated the post and permalink it again shows a 404 error, so in this situation you can use custom redirects too.
Reason 3: We often, make a spelling mistake in our permalinks, and our attention goes to it after a long period of time. If you change that permalink, you will lose the ranking in case that permalink is indexed and ranked. In this situation, the best option is to redirect the old permalink to the new permalink.
Reason 4: If your blog has broken links and there is an error of 404, then you can fix them too for your visitors by redirecting such links as well.
Now, let's begin the journey of setting up custom redirects in blogger!
How to Set Custom Redirects in Blogger?
If you face any of the above problems, you can use a custom redirect in your blog. You can easily set custom redirects in blogger by following the below steps.
Here’s an example: Suppose you are changing the permalink of an old post. Suppose the permalink of your old post was "https://www.amanchourasia.in/2021/09/custom-redirects.html" and we are going to change this permalink "https://www.amanchourasia.in/2021/09/custom-redirects-in-blogger.html". If you do not redirect here, you will lose that post's ranking and the incoming traffic.
I will guide you to set custom redirects in blogger. Ok, let’s begin!
Step 1. Firstly, I want you to login into your blogger dashboard and select the blog in which you want to make the redirects'.

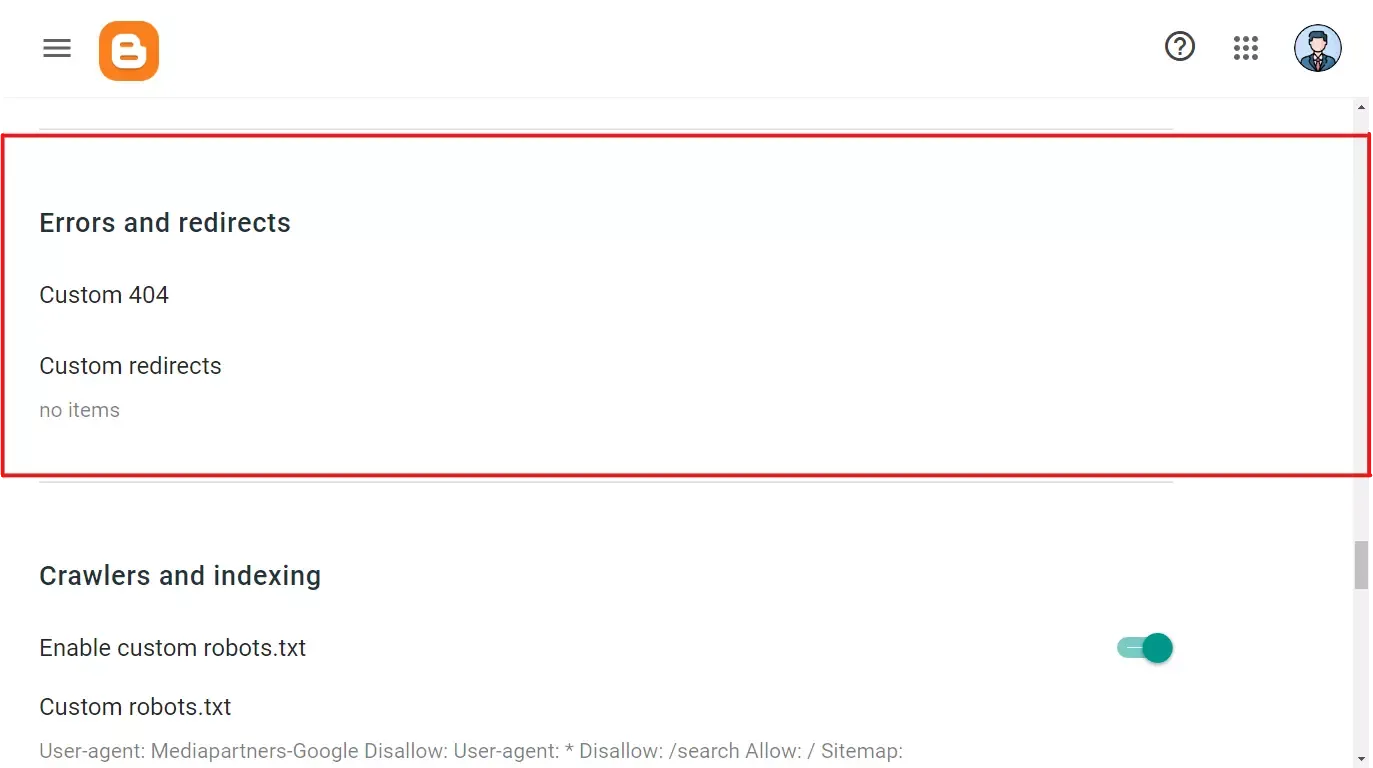
Step 2. Well, now click on the Settings option and scroll down to the Errors and redirects section!

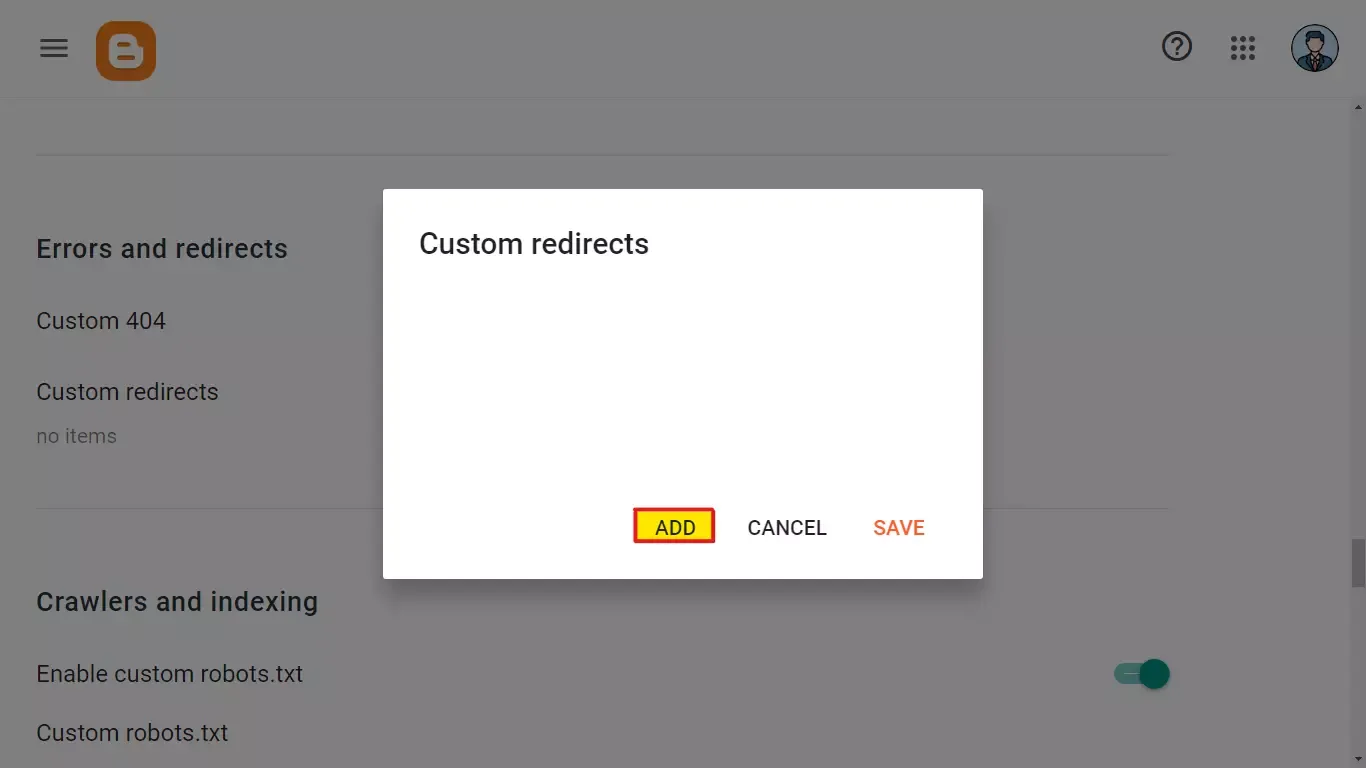
Step 3. Kindly, click on the "Custom Redirects" option and then click on the "Add" button.

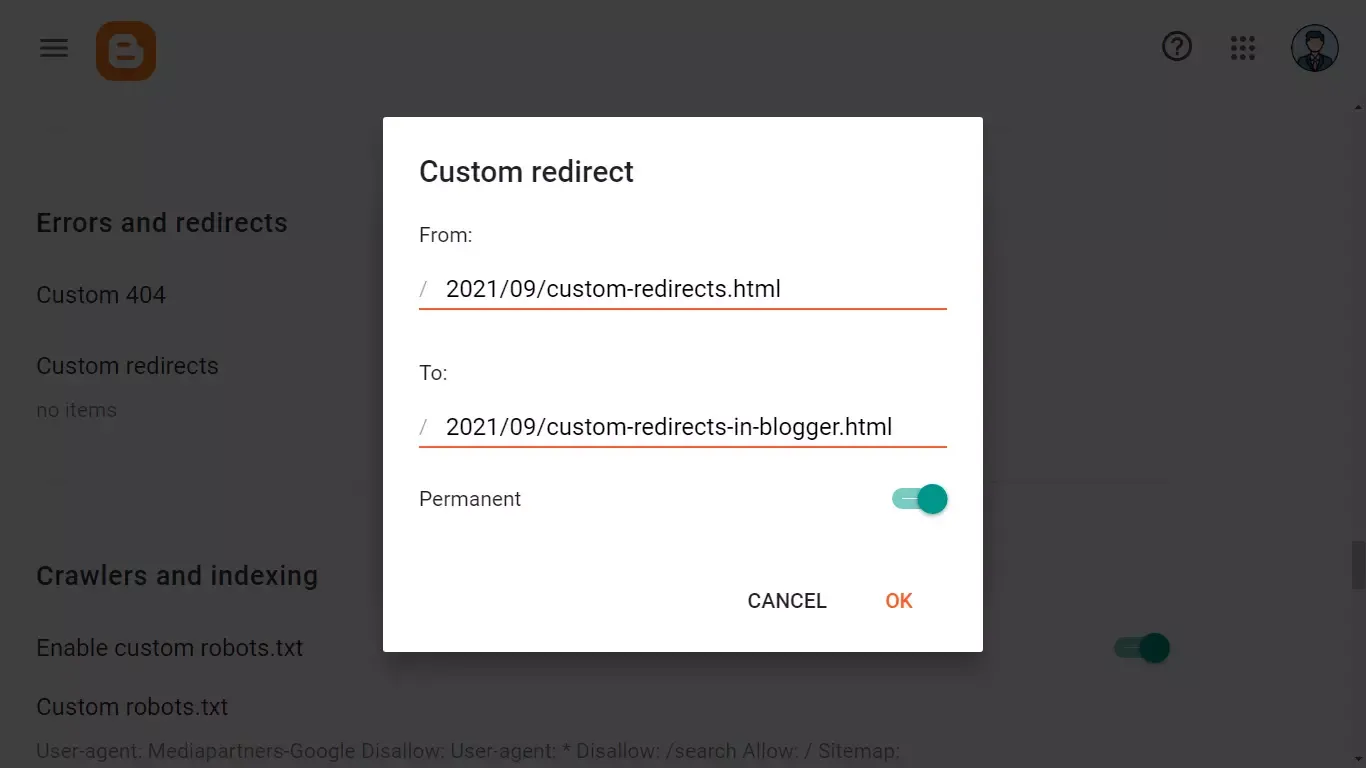
Step 4. Now, you will have a box like the image shown above.
Paste the old permalink in the box of "From" (https://www.amanchourasia.in/2021/09/custom-redirects.html) No need to paste the domain, only paste the section marked as per your URL.
Paste the new permalink in the "To" box. (https://www.amanchourasia.in/2021/09/custom-redirects-in-blogger.html)
Step 5. The final step to recheck the links you have entered. Once confirmed, click "Ok" and then save it!
That’s it! You just have to perform the stated steps in your blogger website to set the custom redirects.
Final Words
Now, as a visitor clicks on your old link from the search engines, it will be redirected to the new link! So friends, how did you guys like this post on How to Set Custom Redirects in Blogger? Now you must have understood How to Set Custom Redirects in Blogger.
Tell us how you felt about this article for How to Set Custom Redirects in Blogger? by writing a comment so that we too have a chance to learn and improve something from your ideas.

